
Contents
How To Adjust Brakes On A Bike? Find Out Here!
Are you an avid cyclist looking to take your skills to the next level? Or maybe you’re just getting started, and want to make sure your bike is in tip-top shape? Either way, being able to adjust the brakes on your bike is an essential skill. This article will teach you how to do that quickly and easily – so let’s get started!
Brake adjustment is a simple process that anyone can do with minimal tools. All you need is a wrench and screwdriver, plus some patience and precision. It doesn’t take long, but it does require attention to detail. By following these steps, you’ll be able to ensure that your bike’s brakes are operating efficiently and keeping you safe while cycling.
Making sure your bike’s brakes are adjusted properly can help prevent accidents or other incidents while riding. And once you know how to do it, adjusting them yourself will save time and money from having to go into the shop each time something needs adjusting. So don’t wait any longer – read on for all the tips and tricks on how to adjust brakes on a bike!
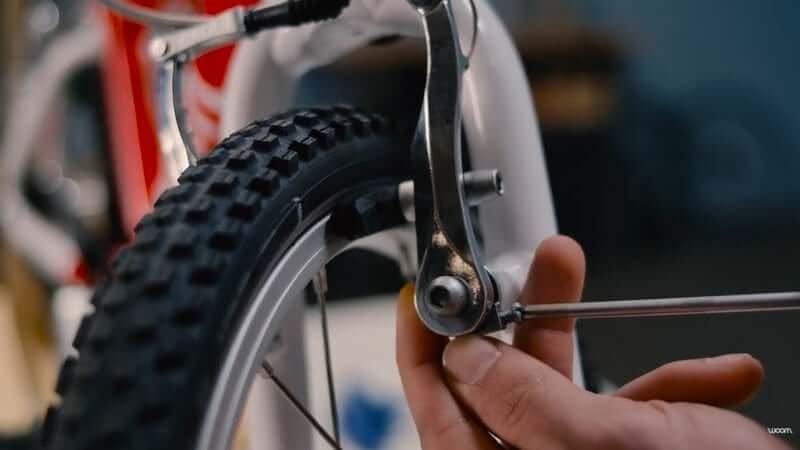
Brake System Components
Brake systems on a bicycle are composed of several components that work together to provide stopping power. The first two components are the brake levers and the brake cables. Brake levers attach to handlebars and help stop the bike by pulling the brake cable, which is connected to the brakes. There are two types of brakes – rim brakes and disc brakes. Rim brakes attach directly to the wheel rim using brake pads, while disc brakes attach to a rotor mounted to the wheel hub. Both types of brakes use hydraulic or mechanical pressure to push the brake pads against the wheel rim or rotor when activated by pulling on the brake lever. With both types of brakes, tension in the cable can be adjusted with a barrel adjuster located near where it connects at either end.
In order for you to successfully adjust your bike’s brakes, you must first properly prepare them for adjustment.
Preparation For Adjustment
After carefully examining the brake system components, it is time to prepare for the adjustment process. Before beginning, the bike wheel alignment should be checked and adjusted if necessary. The tension of the brake cable should also be verified and, if needed, tightened or loosened for proper operation. Additionally, the position of the brake lever must be adjusted to ensure adequate clearance between it and the handlebars.
Next, both sides of the brake caliper must be loosened so that they can be moved freely. This will allow for proper alignment of the brake pad with respect to the wheel rim while braking. Lastly, once all these steps are completed, check that everything is properly tightened and in place before proceeding to adjutment.
Adjustment Process
Adjusting brakes on a bike is an important part of regular maintenance. To begin, you’ll need to check that the brake pads are properly aligned and that the wheel is centered between them. This will ensure your bike stops in a straight line when braking. Next, you’ll need to adjust the cable tension by turning the adjusting screws on either side of the brake levers until they feel firm but not overly tight. Lastly, make sure the wheel is still centered between the brake pads and that it moves freely, giving you plenty of room to maneuver when you pull on your brakes. With these steps completed, you should now have a properly adjusted set of brakes for your bike.
Frequently Asked Questions
How Do I Know If I Need To Adjust My Brakes?
Figuring out when you need to adjust your brakes is an important part of bike maintenance. There are a few key indicators that can tell you if it’s time for a brake adjustment or if the brake pads need to be replaced. By learning how to spot these brake adjustment signs, you can ensure your bike’s brakes are functioning properly and that your safety is not compromised.
The first thing to look out for are signs of brake wear indicators. As the brake pads start to wear down, there will be a noticeable decrease in their performance – such as when they take longer to stop the bike than usual. Additionally, if your bike suddenly starts making more noise while braking, this could also mean that the pads have worn down and need replacing or adjusting.
To do a proper brake pad evaluation, it’s best to check the pads visually and measure them against the manufacturer’s specifications. You should also check for any discoloration or burning on the rotors which could indicate excessive heat from braking too hard or incorrectly adjusted brakes. If you notice any of these signs, then it’s likely you’ll need to adjust your brakes in order to maintain safe braking performance.
In summary, understanding the signs of when you need to adjust your brakes is a crucial step in maintaining your bike’s safety and performance. Paying attention to brake wear indicators, evaluating brake pads regularly and looking out for discoloration on the rotors are all key elements of effective brake maintenance.
What Type Of Brake System Should I Use On My Bike?
Deciding which type of brake system to use on your bike can be a daunting task. There are many different types, each with their own pros and cons. This article will take a look at the five main types of brake systems: disc brake system, rim brake system, coaster brake system, hydraulic brake system, and cable brake system.
- Disc Brake System:
- Pros: Highly efficient braking due to the superior friction generated between disc and pads; easy to adjust; durable in wet conditions.
- Cons: Expensive; must be serviced regularly; not suitable for all frame designs.
- Rim Brake System:
- Pros: Low cost; lightweight; minimal maintenance needed.
- Cons: Poor performance in wet weather; frequent replacements required due to wear on rim surfaces.
- Coaster Brake System:
- Pros: Easy to use and maintain; cheaper than most other systems.
- Cons: Limited stopping power; not suitable for high speeds or long distances.
- Hydraulic Brake System:
- Pros: Smooth operation; self-adjusting feature allows for long periods between maintenance; excellent stopping power in all weather conditions.
- Cons: Expensive components and installation costs associated with this type of system.
- Cable Brake System:
- Pros: Cheapest option available; easy to install and maintain.
- Cons: Not as powerful as other braking systems; prone to rust over time if not properly maintained.
When it comes down to choosing the right type of brake system for your bike, it’s important to consider both the pros and cons of each one before making a decision. In addition, budget is also an important factor when deciding which type of brake system is right for you as some may be more expensive than others. Ultimately, it’s up to you decide which type best meets your needs so weigh all your options carefully before making a final decision!
Is It Possible To Adjust My Brakes Without Specialized Tools?
Is it possible to adjust your brakes without specialized tools? Absolutely not! Adjusting your brakes requires tools that are far too complex for the average person to understand, let alone use. It’s almost impossible to do anything at all without the right tools and resources! To make matters worse, even if you do have the necessary tools, brake adjustment is a process that requires great precision and attention to detail.
Without specialized tools, you won’t be able to get the exact adjustments needed for your bike’s brake system. You could end up damaging your bike or worse: hurting yourself in the process! The slightest misstep while adjusting brakes can lead to dangerous consequences – so having the right resources is absolutely essential.
If you want to take on this job yourself and make sure it gets done right, investing in the right tools is a must. From screwdrivers and wrenches to specialty items like calipers and gauges, having these specific tools on hand will ensure that you can make all of the necessary adjustments for your bike’s brake system with ease. Not only that, but using these specialized tools will also help save time by avoiding any potential mistakes along the way. So don’t hesitate – equip yourself with everything you need before tackling this task!
How Often Should I Adjust My Brakes?
It is important to know how often you should adjust your brakes. Adjusting your brakes regularly is essential for the safety of yourself and others. Brake adjustment frequency can vary depending on the type of bicycle, riding conditions, and the condition of the brakes. Checking your brake condition frequently and inspecting them routinely are necessary steps to ensure your bike is operating safely and efficiently.
When it comes to brake inspection intervals, it is recommended that you have a professional inspect your bike every six months or so. This ensures that all parts and components are functioning properly and any adjustments needed are made in a timely manner. Additionally, if you ride your bike more than usual or in extreme weather conditions, be sure to check your brakes often and adjust them accordingly. Doing this will help keep your bike in optimal working order for years to come.
Regular brake inspections and adjustments will help keep you safe while riding and prevent costly repairs down the road. Make sure to take the time to inspect your brakes routinely, check their condition frequently, and adjust them when necessary so that you can confidently ride knowing that everything is in tip-top shape.
Can I Adjust My Brakes While The Bike Is In Motion?
Adjusting brakes on a bicycle while the bike is in motion can be a tricky endeavor. While it’s possible to adjust your brakes while in motion, it’s not recommended and could put you at risk of injury or an accident. If you are considering adjusting your brakes while moving, it’s best to first understand the process and safety concerns associated with this task.
When adjusting your brakes while in motion, you must pay close attention to how your brakes are responding. It’s important to note that if they are not responding correctly, then it’s best to stop and make any necessary adjustments before continuing on your ride. Additionally, when adjusting the brakes while in motion, make sure that you control the speed of the bike by using the gears instead of relying solely on braking power. This will help ensure that you do not lose control of the bike due to sudden brake force changes.
It is also important to consider that adjusting brakes while moving may require more effort than traditional static brake adjustments due to increased wind resistance and other factors. Be sure that you have all necessary tools available before attempting this task as well as a safe place where you can stop should anything go wrong. Ultimately, it is best for most riders’ safety to adjust their bicycle brakes when stationary rather than in motion.
Conclusion
It’s important to make sure your brakes are in the best condition possible. Adjusting your brakes is an important part of bike maintenance, and it’s essential you do it regularly. With the right knowledge and tools, adjusting your brakes can be a relatively simple task.
In conclusion, knowing how to adjust your brakes is a must if you want to keep riding safely. It doesn’t take much time or effort if you’re equipped with the right information and tools. Don’t let unadjusted brakes be a roadblock on your cycling journey – take the time to make sure they’re in good condition and you’ll be ready for any adventure that comes your way!
So get out there and start pedaling – with properly adjusted brakes, you’ll be sure to enjoy every single ride!
Last Updated on March 21, 2023 by Sammy

